Monday, 29 December 2014

After Christmas

Many apologies to my few followers that I've not been around for a while. I've lacked inspiration, so I've not be able to inspire you. However, the festive season always gets my creative juices running. There's so much food around, and I hate to see things go to waste!

So here's a leftovers pie - but it's a bit posher than usual. First off let me say that this isn't exactly my own idea. I stole it from fellow blogger Lee at Kitchen Connection. I didn't follow it exactly though. Her recipe is for small triangular parcels. I went for something a bit bigger.
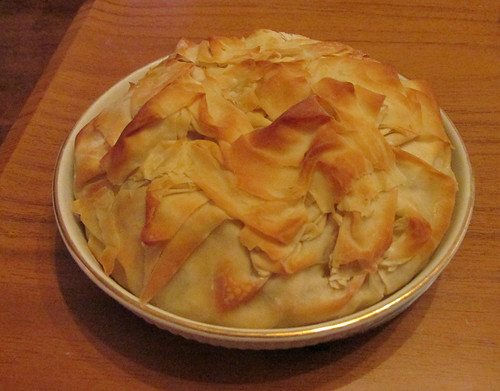
Pie
This is my cheese, onion and potato filo pie. 

Don't waste your time trying to make filo. Even TV chefs say you should buy it ready made.  I bought a pack 'because it's Christmas' but I had no idea what I was going to do with it until I read Lee's post.  I've always avoided filo in the past because I was a bit scared of it, to be honest, but there's no need to be.

This pie took three sheets (and they come in packs of six, so I've frozen the other three). I cut them all into halves.

I began by greasing a pie dish with melted butter. Then I laid three half-sheets into the dish, with melted butter between each layer.

Then I put leftover cooked potatoes and some fried onions in. Between the lumps I dotted bits of cheese. I used what we had left over - some brie, a bit of goat's cheese, and cheddar.  I wish I'd used more cheddar.  I also seasoned it, but it would have benefited from a bit extra pepper, or maybe a little mustard.  It could also probably have benefited from a rasher or two of bacon. 

Once the filling was in I folded over the edges to make a rough side to the pie, then I topped off the hole in the middle by ripping strips off the remaining half-sheets and crumpling them up (like in the photo).  The whole thing was then brushed with more melted butter and popped into the oven at 190C for 20 minutes.

It browned nicely, but the bottom was still slightly soft. I think next time I'll use a metal pie dish, not a ceramic one.

Wednesday, 11 June 2014

Breakfast

Don't waste your money on this kind of stuff
Do you spend a fortune on breakfast cereals?  Well stop it. Here's a way to make a cheap, tasty and healthy version of muesli.


Serves 4

In a large bowl, place -
8 tablespoons dried porridge oats
Any 4 of the following:
     handful of raisins or sultanas
     6 dried dates, chopped
     4-6 dried apricots, chopped
     6 glace cherries, chopped
     a grated apple
     tablespoon of any dried fruit
A sprinkling of chopped nuts
A couple of teaspoons of seeds
A good glug of fruit juice

Stir it all together then add enough cold water to make it look like wet porridge. Cover and leave overnight.  By morning it will have slightly solidified because the  dried fruit and oats will have absorbed the water.
Serve with milk or yoghurt.  Each portion contains one of your five a day.   And there's no added salt or sugar!


Saturday, 3 May 2014

Cocktail hour

It's a bank holiday weekend in the UK and the weather promises to be warm and sunny, so what better time to enjoy a cocktail or two?

You can pay around £8-10 a time for cocktails in a bar, but you can mix up several at home for the price of a round in your local pub.

For cocktails you don't need the best brands of spirit. Supermarkets will sell you their own label, and by the time you've mixed them up you won't notice the difference.

So pop a couple of ice trays in the freezer and hop off down to your local supermarket while they solidify. Pick up a half bottle of sweet vermouth, a half of bourbon, a half of white rum, a couple of oranges, a couple of limes and some fresh mint. And you're made. You should also have change out of £25 if you shop wisely.

You don't need posh glasses. You don't need a proper shaker. You can use any old wine glasses, a jug and a long spoon.

Manhattan
Don't have a spirit measure? I bet you have some measuring spoons. Measure equal amounts of vermouth and bourbon into a jug, Add ice cubes and give it a good stir. Meanwhile remove a sizeable slice of peel off one of the oranges, wipe the orange side around the rim of a wine glass and drop it into the glass. Your cocktail should be cold by now. Strain it into the glass (a tea strainer is fine!) settle into the garden or anywhere comfortable, and enjoy.!

Mojito
Whizz up some ice cubes in a food processor or grinder and put into a jug. Add a measure of white rum. (A standard pub measure is 25ml, or five teaspoons.) Squeeze half a lime into it. Add half a teaspoon of sugar. Crease up a few mint leaves and mush it all up together. Then tip it onto your glass. You can decorate the edge of the glass with a lime slice if you like. Bottoms up!


Monday, 23 December 2013

Setting a Festive Table

Setting a festive table
Compliments of the season to you all. I hope you're all ready for your big day, whichever big days you plan to celebrate over the holiday season.  I just thought I'd show you a few tips on how to make your table nicely festive without going overboard. Chances are you'll have all the things you need for these ideas, or you can always adapt them to suit what you have.

Setting a festive tableDo you have a colour scheme for your festivities? The dining room in Auntie Anne's house is red this year, mainly because I had a lot of red baubles and plenty of that curling ribbon. I also have a rather smart red table cloth, so I can blend the shades for a co-ordinated look.

I like to have some sort of decoration on the table, but nothing that interferes with the meal. Nothing so tall that it gets in the way of conversation, and nothing so short that it's possible to stand your glass half-way onto it and spill wine on everything.

Setting a festive tableFirst and most important thing to remember is that a special occasion calls for the best crockery, the best cutlery, the posh glasses and whatever you have that normally lives at the back of the cupboard because it isn't for everyday use. You don't have 'best'? Then make sure you polish everything well with a dry tea cloth so it sparkles.

You can see the overall effect of the decorations in the top photo. You'll notice there are festive baubles in various shapes, suspended on curling ribbon and hanging from convenient pictures. What you can't see is that we have a sheet of lights suspended from the ceiling beams. That's not necessary, but it does add a festive touch.

Setting a festive tableTo create a central decorative area on the table I ran a roll of tartan ribbon from end to end. Wrapped around that are strips of curling ribbon, suitably arranged, with the ends run between my thumb and a scissor blade to increase the curls. Then I scattered table confetti (holly leaves) across that. Usually I would also scatter chocolate coins around, so that people could help themselves when it came to coffee and liqueurs, but on this occasion we planned to adjourn to the lounge for that - so I didn't.

Setting a festive tableIndividual place settings had a gift, a nice napkin, and a colour-themed cracker. I also tied some tartan ribbon around the stems of the wine glasses and some tiny red baubles that were meant to be used as gift wrapping, but I had some left over.

Setting a festive tableThen I tied some Christmassy ribbon around the backs of the chairs. I didn't have any more tartan - so it's not the same theme, but I didn't really care. One three-metre roll of wired ribbon was enough for two chairs.

Finally, at the far end of the table I put a large, plain, glass vase with some lights in it. That's very trendy this year, but I've been doing it for a while now. What Auntie Anne does this year the world will do in a while!

One last thing. A table this good needs a meal to match.
Enjoy!
Setting a festive table

Monday, 20 May 2013

Photo editing

It seems some people are having a lot of trouble editing photos in Blogger. So I think I might run through a few options to see what you can do.

First of all, there are several ways to upload a photo to Blogger. Most of them you get to by clicking on the little picture icon:
photo editing But not all.......

If you understand html there are other options. But for now, let's look at what happens when you click the little picture.  It offers upload options:
From this blog
From Picasa Web Albums
From your phone
From your webcam
From a URL

Now, some of you will have realised that 'From this blog' and 'From Picasa Web Albums' creates a problem after a while. Blogger limits the amount of space you can have to store your photos and you have to pay for more.
(Unless you've been clever and shrunk all your photos in the first place. I didn't - so I ran out of space pretty quickly and I'm too tight to pay for more.)
You need an app to use your phone. I shall assume if you are capable of uploading an app, you are capable of uploading a photo!
Ditto webcam.
From a URL can be very useful but BEWARE of copyright infringements.

If you have a website elsewhere (like I do) you can use the URL to insert a link.  A URL will look something like this:
http://www.historyanorak.co.uk/history/TheNewHistoryanorak/art_and_sculpture/Sculpture/rank_broadley/pix/Rankbroadley_malmsbury_wrestlers_1.jpg
and if you paste it into your text, Blogger will automatically make a link to it.
If you paste it into the space given when you use the 'From a URL' option (as above) you'll get this:

Note.  I took the photo. I own the copyright. I also own the rights to the website where it appears. If you don't fulfil those conditions GET PERMISSION before you use the picture.

There is another option.  That photo also appears on (one of) my Flickr site(s).  Flickr can give you a URL for the picture but it can also give you (under the 'share' option) HTML or BBCode.  That looks like this:
<a href="http://www.flickr.com/photos/historyanorak/161785585/" title="Malmesbury Abbey House - The Wrestlers by historyanorak, on Flickr"><img src="http://farm1.staticflickr.com/78/161785585_11948a0602.jpg" width="375" height="500" alt="Malmesbury Abbey House - The Wrestlers"></a>

But to use that you need to be in the HTML option at top left of the Blogger composer.  If you don't understand HTML, avoid using it.  (Or look here)

This post has gone on quite long enough.  Come back to the next post for stage 2.

Friday, 17 May 2013

Barbecue chicken

Sorry, no photo for this one. I was too busy eating to get the camera out!

A quick note on barbecue sauce. It's easy, and home-made has considerably less sugar and salt than any of those 'cook-in' sauces you can buy in jars.

Last night we had chicken and chips, but to make things a bit tastier I marinaded the (already cooked) chicken breasts in some homemade barbecue sauce all day before popping them in the oven for around half a hour to warm through.

Start with some tomato puree and oil. They mix together to make a great paste that sticks really well to food. Then you need to remember to add five things:
  • salt
  • sweet
  • heat
  • sourness
  • aroma

Salt's easy. You can, if you like, just add salt. But if you use something like a couple of anchovies, or some Worcester sauce, you get salt plus flavour.

Sweet. Honey, sugar, marmalade, jam. Just stick in a relevant amount. Tablespoon of conserve, just a teaspoon of pure sugar will be enough. Pulped fruit such as plums or apple is also an interesting variation.

Heat. Well. Chilli and ginger are the obvious ones here. But don't forget black pepper.

Sourness. Lemon juice is good. So is some sort of vinegar. Or if you have tamarind that's also very yummy.

Aroma. Well, that's whatever you like. Garlic is essential in my opinion, but if you don't like garlic, don't add it. Any kind of herb or spice that you like will add to the taste.

Last night's mix consisted of tomato puree, olive oil, celery salt, brown sugar, freshly-ground black pepper, dried ginger, garlic powder, balsamic vinegar, and ground cumin.  And very good it was too!  

Saturday, 23 March 2013

Emergency rations

We're snowed in here at Auntie Anne Towers so I've done a bit of a review of what's available to make sure we won't starve. It's unlikely to be a long haul - but it's looking like it could be a few days before normal service is resumed.

This is when your store cupboard is vital. I have a few fresh veg - and I never allow myself to run out of spuds or onions. Beyond that it's down to the staples.

Think in headings.

Pasta
I always have dried pasta in store, and there's some fresh pasta in the freezer. So I have spaghetti and I have shapes (currently shells). That means, with some judicious tin opening, I could make:
Spaghetti vongole (I have a tin of clams - but tuna fish would work just as well) Just use some garlic - dried will do to give flavour - and a small onion, to add flavour to the dish. A splash of white wine and a sprinkling of chilli flakes would help. And scatter a few dried herbs over the top - Italian ones for preference: basil, thyme, oregano.
Macaroni cheese. It doesn't have to be tube-shaped pasta in mac and cheese you know. Add some mustard to the sauce for extra punch.
Pasta bake. Just part-boil your shapes and add them to a sauce made from tinned tomatoes with herbs, garlic and onion. Add a few mushrooms if you have them. A tin of sweetcorn nibs wouldn't hurt either.

Rice
Risotto. You can make almost anything into a risotto. Tinned peas, mushrooms, tinned tuna, frozen prawns. As long as you have garlic and onion and some good stock you put by for this kind of occasion, you're made!
Curries. Whatever you have in a tin can be curried. Or this is maybe the way to use up your veg. Or leftovers. If you understand curry spices, go for it. If not, use ready-mix curry powder. Dried coconut, yoghurt, banana flakes, sultanas, all add to the flavour and help vary your dishes.
Chinese. If you've got soy sauce and some sesame oil you can make anything taste Chinese. Specially if you have five spice powder, ginger and garlic.

Leftovers
Seriously - take a good look around your kitchen and see what you have. We had tapas-style dinner yesterday so there were a few bits and pieces in the fridge that I've whizzed up together today into a pan of soup. The stewed peppers have given flavour and the leftover potato salad made it thick. There's some ciabatta that's going a bit dry today, but it'll make great garlic bread. If I make that into cheesy garlic bread it's almost a meal in itself.

Buon appetito!

Thursday, 7 February 2013

What can I do with..... a tin of tomatoes?

Regular readers will know that I'm a staunch supporter of making the most of things. If there's even a small amount of food (and sometimes other things) leftover I will find something tasty to do with it. Sometimes though, you don't have leftovers, and you have to raid your store cupboard for inspiration. But the contents of your cupboard might not always be inspiring. Not to worry. Here's some ideas for using the humble tinned tomato.

  • Italian sauce base. It's the absolute essential ingredient for any kind of pasta sauce, from a simple pomodoro to puttanesca. You can add almost anything to it, but you must have garlic, black pepper and herbs (basil, oregano, thyme) as a minimum. Then you can put in whatever else you fancy.
  • Pizza topping. If you drain the tomatoes first you can make a much thicker 'sauce' that's perfect for a pizza. Remember to keep the juice because it has lots of uses itself.
  • Salsa. Drain the tomatoes and reserve the juice for another dish. Add chilli flakes or finely chopped fresh chilli, a squeeze of lime juice, chopped leaf coriander, and crushed garlic.
  • Nacho sauce. Make some salsa. Tip a pack of nacho chips into a heat-proof bowl. Pour the salsa over them and top with grated cheese. Grill until the cheese melts. Enjoy!
  • Vegetable pie. Drain the tomatoes and reserve the juice for another dish. Roughly chop the tomatoes and add mixed cooked vegetables. Whatever you have. Pile the lot into an oven-proof dish and sprinkle breadcrumbs and grated cheese over the top. Bake for about 20 minutes at 200C, until the top turns brown and crunchy.
  • On toast. It's a simple but tasty, easy-to-prepare meal. If you add grated cheese it's even nicer!
  • Pizza toasts. Use the pizza topping, as above, but don't bother with the hassle of making bases. Use thick toast or French bread.

Stuff to do with the juice

  • Drink it. Some people like tomato juice as a drink. It's full of vitamins and very good for you. Spice it up with celery salt, black pepper, a splash of tabasco.
  • Bloody Mary. That's tomato juice with added vodka!
  • Soup. You can make great tomato-based soups by simmering the juice with some vegetables and herbs, then thickening the resultant mixture with some cornflour and cold water.
  • Vegetable stew. Make a nice thick soup and add pasta shapes about 10-15 minutes before you thicken it. Chunks of potato work too!
  • As an ingredient. Add to any meat-based casserole for added depth of flavour.
  • For cleaning. Honestly. You can clean copper with it - but not too often or you'll dissolve your copper away. Tomato juice is very acidic and cleans the grot off copper and brass quite easily if you apply it with a cloth. Try a small area of the item first though, preferably where it doesn't show.
  • To deal with skunk spray. Apparently it's a myth. The tomato smell disguises the skunk smell but doesn't actually remove it.

Thursday, 3 January 2013

Cheap, cheerful and easy potato dish

New Year Dinner_ Veg (2)
Happy New Year one and all. I hope Santa brought you all you wanted (or at least what you needed.) I thought you might like to share in something we ate on New Year's Eve at Chez Tante Anne.  I did pheasant casserole with cider and cream, but I won't try to get you to do that until you're feeling a bit more adventurous with your cooking. (It was the first time I ever cooked it so I've been wary of it for a long time.)

However, I did these very simple and yummy spuds alongside the meal and they are just so easy you'll kick yourself for not cooking them before.

Heat your oven to about 180C (that's fan temperature. a little higher for standard ovens, though it's not critical). While it's warming up, grease an ovenproof dish. I like using the one in the photo because you can see how things are progressing while it cooks, but that isn't essential. A lid is though. (If you don't have a lidded dish, use foil.)

Peel some potatoes. Any kind, although larger ones look nice when you're done, and cut them into thin slices.  Do the same with a couple of onions. If you like garlic, peel and squish a couple of cloves of that too.

Now layer the whole lot into the dish. Start with onions and end with potatoes. Every couple of layers dot the spuds with s bit of butter or a smear of oil. Not too much! And add a sprinkling of salt (JUST a sprinkling - we're not breeding heart attacks here) and a hefty grind of black pepper.

Add enough chicken stock to come about a third of the way up the side of the dish. PLEASE don't use a whole stock cube if you have those nasty, salty commercial ones. A VERY tiny amount will be sufficient.

Now put it in the oven, on the bottom shelf will do, and ignore it for about 40 - 45 minutes. (The first time you cook it you might like to check after half an hour, just in case it's drying out.) If it looks a bit dry, add a small amount of water. (This is where the glass sides come in handy.) After 45 minutes it ought to be browning on top. You CAN leave it for up to an hour and a half, depending on how crunchy you like the top layer, but I find an hour is about right.

It goes with practically any roasted meat. Maybe some fish. If you want, you can even top it with grated cheese about 15-20 minutes before it's done and eat it by itself. Perhaps some sliced tomatoes with the cheese. Brown sauce goes well with it. If you can bear to leave any, it's pretty good cold on the following day too!


Thursday, 15 November 2012

Leftovers cooked meat pie


An Auntie Anne Recipe
Looks better after you brown it in the oven

You are all very aware that Auntie Anne likes to save money wherever possible - well here's a tasty way to use up some leftovers and nobody would ever know that you didn't plan it.

If you've followed the advice in other parts of this site you almost certainly have bits of leftover cooked meat in your freezer (pickings from a chicken, the tail-end of a bit of boiling bacon, a couple of chunks of any old roast meats really.) You should also have herbs in your store cupboard and a couple of veggies somewhere in your fridge. And you must have some potatoes somewhere. Maybe you even have leftovers from last night's dinner.

You will need:
Some cooked meat.
A herb that suits it (sage with beef, tarragon with chicken etc.)
Some veg.  Such as mushrooms, tomatoes, frozen peas, tin of sweetcorn, cooked carrot etc.
At least one onion.
A couple of garlic cloves (or dried if you don't have fresh)
Half a pint of milk
A bit of cornflour (a heaped teaspoon or two will do it)
A few potatoes, or some leftover mash.

An Auntie Anne Recipe
Chop your onion roughly and put it into a pan with the milk. Peel and chop the garlic and add that. Simmer it for about 10 minutes until the onion softens. Mix your cornflour with a small amount of cold water and add it to the pan. Bring the whole lot back to the boil, stirring, until teh mixture thickens.  Put it to one side.
An Auntie Anne Recipe

In an oven-proof dish place your chunks of meat and intersperse them with the vegetables. Mushrooms and tomatoes can go in raw; small frozen veg ditto. Hardier veg such as carrots, parsnips, sprouts and such like will need a bit of a boil first to soften them. Sprinkle the whole lot with your chopped herbs. (Dried are fine!)
An Auntie Anne Recipe

Then pour the onion and milk mixture over the top. Set aside.

Peel and boil some potatoes and mash them with a splash of milk. Add nutmeg if you like. It tastes good in spuds. Now spoon the mashed spuds onto the top of the dish and rough up the surface with a fork.

Stick the whole lot into a hot oven for about 15 minutes until it browns on top.  Serve with another veg that doesn't appear inside the pie.


Tuesday, 9 October 2012

Those pesky Blogger changes

Seems like a few of you are still having trouble navigating around the new Blogger interface.  I agree, it's not as user friendly as the old one, but we have to put up with it now it's been forced on us.

I'm going to start with a simple lesson that I hope will be useful to those of you still suffering.

Let's start by finding the dashboard.
They've removed the thing that takes you directly to it - so if you haven't got it bookmarked, go to someone else's blog, and there will be a link in the top right hand corner. (next to sign out)
Double click on that and you'll get to the Dashboard.

If (unlike me) you only have one blog, it will be relatively simple to find your way around.
The title of your blog will be at the top of the page and, to the right, you'll find an orange oblong with a square on it, a picture of two sheets of paper with a little triangle next to them, and another square that says View Blog.

Let's do the easy bit first.  View Blog will let you do that exactly. If you click on it, you'll get the front page of your blog.

The orange oblong is your "new post" link. If you want to write a new post, click that.

Editing a post
Which leaves us with the middle bit with the pages on it.
Click once on the little triangle to the right. That opens a pull down menu.
The bit you need to know for now is Posts.
Click once on Posts.
That will present you with a list of the posts you have written so far.
To Edit a post:
Find the title, click on the little square to the left. That will put a little tick into the square and open up four choices below the title: Edit View Share Delete
Click once on Edit.  Hey presto!  Your post is there, ready to edit.
Make your changes.   
To add labels, click on labels at the right hand side. Remember to separate them with commas. And click the oblong Done button when you're finished.
Now click the Update button (orange one at the top), and you're back to the list.
Tick the box, click View, and there's your updated post.

If this was useful, let me know. I'll sort out lesson two later.

Monday, 20 August 2012

Photo posting in blogs

A lot of people have trouble with Blogger because after a relatively short while it will ask you to pay for the option to post more photos. There are easy ways round this, particularly if you already pay for a photo hosting system such as Flickr.

So, for example: If you go to one of your photos on Flickr (not your stream - an individual picture) you will find just above it , a pull-down menu called 'share'. Pull down the little pointer on the right and it will offer you a number of options including 'grab the html/bbcode'. Copy the code (right click, copy) all the way from <a to /a> and return to your Blogger post.  Make sure you are in 'Edit HTML' and not 'Compose' and just paste the gobbledegook-looking stuff into the text box.  Now switch back to 'Compose' and you should have a photo. You can resize it or move it right, left or centre, just the way you normally can.

That's how I did this:

Iconoclasts.
You'll find it links back to a Flickr site called HistoryAnorak. I have permission to use HA photos but you can only use them if you ask nicely!

Now suppose you've found a photo somewhere else. Is it free to use or is it copyrighted?  Have a look here. Pick a photo from the list that says "random free use photos" and click on it. Now right click on the enlarged version and click on the bit at the bottom of the menu that says 'properties'. That will give you another box that has 'address/url' somewhere near the middle. Copy that URL all the way from http: to .jpg (or however it ends) and click 'OK'.

Come back to your post and click the little picture icon to insert a photo. It will offer you a number of options, the bottom one being 'from a URL'. Click on that and paste the url into the box that appears.  And you should get this:

Monkey by Monica Galante

If you chose the cute monkey. Otherwise you'll get whatever you chose.   Happy photo pasting!

Tuesday, 14 August 2012

Borsch - an East European treat

Borsch in dish

Beetroot is plentiful right now and you can pick up huge bunches of it quite cheaply. This traditional East European soup is a lovely way to use it.

You will need:
Beetroot
Potato
Carrot (or swede)
Onion (or a couple of shallots)
Dill
Chicken stock
Lemon zest and juice
Plenty of black pepper
About a teaspoon of oil
Sour cream (or yoghurt) for serving
Peel the vegetables and chop them (quite chunky will do). You'll need to be careful with the beetroot because it'll stain your hands. Wash your hands straight away in plenty of cold water.

Put the oil in a pan and heat it, add the vegetables and sweat* them for a couple of minutes. Everything will go beetroot colour - don't worry. Add the chicken stock, black pepper, lemon juice and zest and the dill and PUT A LID ON THE PAN! Bring to the boil. As soon as it boils, reduce the heat and let it simmer for an hour or so. Check from time to time to make sure it isn't reducing too far. 

When it looks like the second picture and the veg are very soft, allow it to cool and put it through a food processor or liquidiser. Test for seasoning and adjust as necessary. Warm it up and serve it with a swirl of soured cream or yoghurt.

*Sweating vegetables just means cooking them for a few minutes in oil, over quite a high heat, until they start to look shiny.

Sunday, 12 August 2012

Something healthy

Stuffed tomatoes
It isn't always easy to get enthusiastic about eating healthily but we all need to make a bit more effort about it. So one way to improve the attraction is by making your meals look attractive. We eat with all our senses - not just taste. The look, smell and feel are important. Even sound can contribute - think sizzling dishes in your favourite Chinese or Indian restaurant.

What you have here is the ingredients of a cottage cheese salad. Lettuce, tomato and cottage cheese. But the cheese has been tarted up slightly with some herbs, black pepper and a dollop of low-fat yoghurt. All it takes is a bit of time.


Sunday, 29 July 2012

Fruit compote

fruit compote

Getting your five a day isn't always easy, so anything nice that helps boost your intake can't be all bad.

There were some nectarines that had seen better days, there was also some dried fruit and the tail end of a bottle of cooking brandy. Start by simmering some water and a glug of brandy in a small pan with some dried fruit. (I used dates and raisins and dried pineapple) As you simmer you'll notice that it starts to form a sort of syrup. Continue to simmer until the juice thickens and the fruit plumps up.

While it's cooking cut up the nectarines into eighths. (Peaches would do, apricots, any soft fruit really.) Add the pieces to the pan and cook for about another minute until they soften slightly. Crumble some walnuts on top.

Take off the heat. Cover. Serve cold with ice cream or cream.

Sunday, 6 May 2012

Potted shrimps (or .... don't let them be seen naked)

Potted shrimps


One of the delicacies of the Morecambe Bay area is potted shrimps and, frankly, if you can find them ready-potted by one of the wonderful local fisheries, then buy them and enjoy. If you happen to be in the area, or if you have an enlightened fishmonger, you might just find them sold naked.

There are all kinds of recipes for potted shrimps and each Lancashire (and Cumbrian) family probably has its own secret ingredient. Some contain mace, others have cayenne pepper, nutmeg, ground cloves, all types of spice. But on a recent holiday on the shores of Morecambe Bay Auntie Anne picked up some undressed shrimps and so faced the challenge of what to add to them.

The travelling food store that goes everywhere with us on our self-catering trips happened to include ground allspice and smoked paprika - and so that's what went in the mix. Added to that were a good twist of freshly ground black pepper and a squeeze of lemon juice.

Melt down a goodly chunk of the best butter you can afford, and stir in the spice mix. Then force the whole lot into some sort of container (a mug will do if you're desperate) and let it set.

Give it at least half a day to mature and for all the flavours to blend, then warm it gently (don't microwave it - the shrimps will go chewy) and spread it on toast or any other kind of warm bread product. The crumpets were a recommendation from a local. A very good idea too!

Saturday, 28 April 2012

Smoked fish chowder

Smoked fish chowder


It doesn't have to be smoked fish at all really. Any old fish will do. It's just that this recipe was done with the leftovers from a seafood feast bought at the Port of Lancaster Smokehouse in Glasson Dock, Lancashire.


The stock
The leftovers from a seafood feast: prawn shells, mackerel skins, crab legs, mussel shells, whatever inedible bits you have left.
Lemon slices
Black pepper
Pinch of salt
Water

Put it all in a covered saucepan and bring to the boil. Turn it down to a simmer and keep it going for at least half an hour. Check occasionally to make sure it isn't boiling dry.

Strain the liquid into a jug and keep to one side. Throw away the wreckage.

The chowder
1 small onion (diced)
1 small potato (diced)
a crushed garlic clove
vegetable oil
tomato puree
pinch of dried herbs
small glass of white wine
lemon juice/white wine vinegar
salt and pepper to taste
Yoghurt, cream or soft cheese (at a pinch)
Leftover bits of edible fish can be added if you have any.

In a saucepan, add diced potato, onion and crushed garlic, add vegetable oil and fry gently until the onion starts to look translucent. Add the stock, the wine, a good squeeze of tomato puree and the dried herbs. Bring up to a simmer and taste. Add salt and pepper if necessary and lemon juice/vinegar if you think it needs it. Simmer until the colour deepens. It'll be quite orange at first but the tomato puree starts to darken as it cooks. If in doubt, give it 20 minutes. Add a good dollop of something creamy (the yoghurt, cream or cheese) and stir it round. Add the fishy bits. Bring it back up to temperature and serve immediately.

Monday, 26 March 2012

That annoying word verification (and how to get rid of it)

There's been a lot of fuss about this horrible word verification thing that crops up on people's blogs.  Blogger makes it happen automatically and a lot of people don't like it but don't know how to change it.   I hope this helps.   Please note that I'm still on the old interface. If you've updated I don't know if this will work.

Go into your dashboard and choose the settings tab, then comments. Like this:
screen

Then scroll down to this bit:
screen

Take off comment moderation and choose 'no' for word verification.
Don't forget to hit the Save Settings button at the bottom.

Tuesday, 20 March 2012

HTML links

Auntie Anne's been asked several times this week how to make links in Blogger comments. It's really very simple.

You'll need to use something called html (that stands for hypertext markup language but you don't need to know that) which is a computer programming language.

Basically you're going to be telling the computer that you want to make a link, where you want to make the link go, and what you want to say in the bit that people click on to get there.

With html, all instructions come in pairs: switch on and switch off. And all instructions are enclosed in pointy brackets like this: <>  Directions are in inverted commas " " and instructions are switched off by using a slash like this /.

The first bit looks like this:  <a href=
The next bit is the place you want to direct to. It has to be enclosed in inverted commas.  Like this:  "http://www.flickr.com/photos/morningaj/"
Then end the instruction with a pointy bracket:  >
Now write the words you want for the link:   This is my Flickr site.
Then end the instruction like this: </a>

The whole thing looks like this:
<a href="http://www.flickr.com/photos/morningaj/">This is my Flickr site.</a>

But when you post your comment it will look like this:  This is my Flickr site.
I suggest you preview your comments the first few times you do it - just to be sure they work.

Friday, 17 February 2012

Afternoon tea 2. How much?

afternoon tea

Afternoon tea used to be a British tradition. 'High tea' with sandwiches and cake and maybe a selection of savouries, kept you going in the long afternoon hours between luncheon and dinner. It was eaten at home, of course, by the nobs in posh houses. Your average Bert was lucky if he had a slice of bread and dripping.

However, afternoon tea seems to be enjoying a bt of a revival. It has been available in the up-market hotels in London for quite a while, of course, but now it seems to be taking off in other places too. But the treat comes at a price.

Afternoon tea at the Ritz, for example will cost you a cool £42 a head which is a bit steep, even if they do throw in a glass of champers. (Not literally, one would hope!)

But even at the Midland Hotel in Morecambe, a newly-refurbished art deco gem on the West coast, it would set you back £15.50.

So why not do it yourself? The secret is to make it feel posh so it seems like just as much of a treat as it would have been if you'd shelled out thirty quid.

So what would you want?
Buy some nice bread to start with. Maybe a selection of small, sliced  loaves of various kinds such as white, wholemeal, granary, ciabatta. Whatever you like. My bread always comes out a bit chunky for 'polite' sandwiches so I wouldn't bother making my own.

Think exciting fillings. Not just plain old ham and cheese. Coronation chicken is a good one. That's enjoying a bit of a renaissance too and it's dead easy to make.  Egg mayonnaise? Prawn cocktail? Beef and mustard?  You HAVE to have cucumber. Smoked salmon with lemon or with cream cheese? The world's your oyster.  Thinly-sliced bread but lots of filling.

Then what?  Well, it's cake time. A pack of yummy biscuits or cookies would be good. Some fruit loaf with butter. Maybe toasted crumpets. Scones, of course. And a couple of cream cakes - bought ones, don't try making your own, it really isn't worth it. Perhaps a fruit tart. Chocolate eclair. Whatever you fancy.

And you need a good quality, special tea. Something like an Earl Grey or even jasmine-scented. But make sure you use the teapot. This is not a time for a bag in a mug! And provide a jug of hot water to top it up with.

Above all, clear your table, put a cloth on it and set it properly with your best crocks and cutlery. You wouldn't expect mugs and non-matching plates in a tearoom would you?  If you've got doilies, use them. Anything you can think of to make it a special occasion. Put a small vase of flowers on the table. Switch off the TV, sit up at the table and talk to each other.

And feel smug about the fact that you've probably done it for around a fiver a head, rather than forty.